

How To Create An Email List In Apple Mail
In this post (and accompanying video) I will show you an easy way to create reusable email templates in the latest version of Apple Mail. And I have to say, I like this way even better than my old way of using stationery. And, it will work with any version of Apple Mail.
UPDATE: This process also works in macOS Catalina (v10.15), Big Sur (v11) and Monterey (v12).
I have been using the stationery feature in Apple Mail as a way to create reusable email templates for quite some time now. It's been a time saver! Unfortunately, Apple removed the stationery feature from the Mail app in macOS Mojave. So, now what? Check out the video tutorial and the instructions below.
Steps to create an email template
- Create a new email message. You can populate the To, Cc, Bcc, Subject and Body of the email with whatever you need to be part of your template. Formatting (bold, colors, etc.) all work fine. You can even add pictures and attachments as part of your template.
- Save the draft message. Close the draft and you will be prompted to save it.
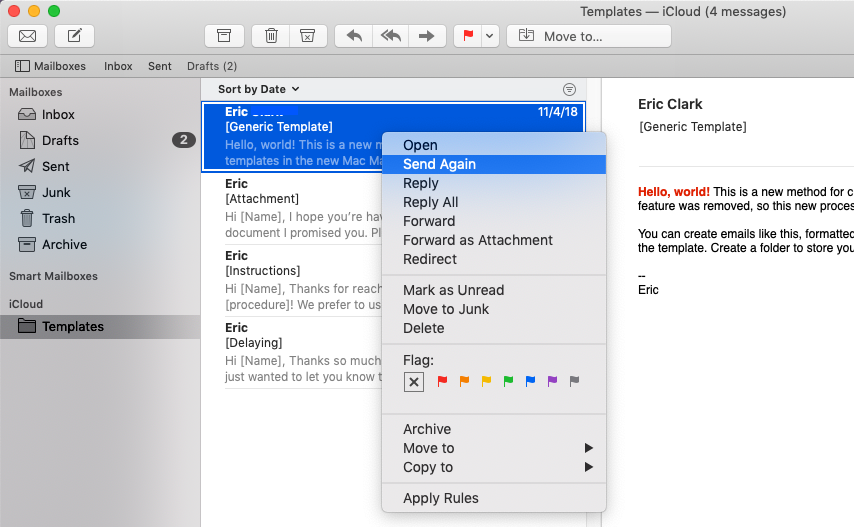
- Create a new email folder called "Templates". You can call it whatever you want, but this will be the home for all of your template messages.
- Move your draft message to the Templates folder. Drag and drop the email draft you saved earlier to the Templates folder you just created.
- In the Templates folder, right click on the message you want to use as a template and click "Send again". The message will open as an editable message, so you can tweak and personalize it before sending it. The original is left in the Templates folder so you can reuse it again and again.
Quick and easy! I have found that this solution is even better than it was before with the stationery feature in older versions of the Mail App.
How to edit email templates
One more thing. What if you want to edit your email templates? It's a great question, because you can't edit them in the Templates folder. So here's what you need to do:
- Drag and drop your template from the Templates folder to the Drafts folder.
- Open the message from the Drafts folder to edit it.
- Save your changes and then drag the message back to the Templates folder.
You might be wondering, why not just leave all of my reusable email templates in the Drafts folder. Great question. Unfortunately, the "Send again" option doesn't exist in the Drafts folder. As soon as you send a draft email it's gone. Not very reusable. Plus, I think it's cleaner to keep templates separate in their own special folder.
If you haven't upgrade to macOS Mojave yet and want to salvage the stationery feature…
Check out this stack exchange tip. It explains what you need to do BEFORE upgrading to Mojave in order to save the stationery feature. Personally, I think the new solution above is superior and you shouldn't be afraid to say good-bye to stationery. But, to each their own.
I hope you found this helpful and saves you time. Please leave a comment below to share about your Apple Mail hacks and time saving tips.
Reader Interactions
How To Create An Email List In Apple Mail
Source: https://ericleeclark.com/create-email-templates-in-apple-mail-mojave/
Posted by: reifmontering.blogspot.com
0 Response to "How To Create An Email List In Apple Mail"
Post a Comment